|
These pages show the photos from making the Victorian hat I wore to the GBACG 1890's hat event in February 2007. The basic idea, wireframe design and instructions for similar hats can be found at this website: http://www.victoriana.com/Victorian-Hats/victorianhat-1890.html This hat is a good choice for those who don't normally wear hats. It can be made extremely light. When this one is on, you don't really notice any change to the balance of your head over just wearing a normal up-do hairstyle. This is also a good time to note that I could not be certain from the pictures on the instructions which part of the frame was intended to be front or back! I picked one that suited me and my hair. Thus I chose the taller part of the bend (the left side on the top drawing below) as the "front" on my hat. I think this may be period correct, but I won't swear to it. Since I have plenty of hair, my hat frame is also a bit taller in proportion than the drawing so it will clear my hair rather than squash into the bun on top of my head. One major difference in the construction is the addition of two small jewelers' rings to the wire frame. My partner suggested this for the hat pin to pass through. You may want to add them also. On my hat they are placed on the second wire slightly offset from the center line of the hat, one closer to the front and the other on a diagonal line from it closer to the back. Make the wire frame by putting your hair (or wig) into the style you intend to wear with the hat. Make sure the frame does not press into your hair at the top, as this can cause your decorations to bulge unattactively and will mess up your hair more if the hat is removed. It is best if you can make the bottom oval and the wire that passes across the top of the hat in one piece by first shaping the oval to sit as you wish on your head and then bending the wire up from the back and soldering it to the front centers and at the back bend joint to hold it in place. Solder the other two ovals into place on the back wire. You will need to hold the ends of both wires in place simultaneously and use a single solder joint for this. You may need an extra pair of hands or a clamp to assist you. You can't do it in two solders since one end will let go when you re-heat the joint to fix the second end in place! Those who don't solder can bind the frame together with tightly wrapped fine wire or sturdy tape, but it may be more fragile to work with than soldered versions. Adding the trim ribbons will strengthen the hat somewhat. After constructing the frame, get out your hatpin and mark the location for the rings if you plan to add those. If you are planning to use tulle or another soft fabric to cover the hat, rings will cause the hat to be much more stable. I covered the wires with vintage velvet ribbon. I had difficulty with the instructions on the site for this step, and what I finally did was to use black bias tape on the inside of the hat and lightly gathered the ribbon to it on the outside. Thus, the ribbon is gathered, but the bias tape is not, and so holds everything exactly where I want it. Be careful not to sew the ribbon closed over the loops. Just sew tightly on either side. The ribbon will puff up to hide them from viewers, but YOU will know to find them when you put on your hat. Then you decorate the hat according to taste. I found a package of seven "silk" nosegays in the bridal section at Michaels Crafts and chose the navy ones (they look bluer in the photo than they really are). I also had a roll of soft black tulle left from halloween. I cut the tulle (which is about 6 inches wide) into 2 to 3 foot lengths, folded it over a bit and attached it as "puffs" to the wires by wrapping it on with the nosegays. It took a bit of fiddling to get it in the right proportions, but was not difficult. I spaced the nosegays evenly around the edges and put one on the top. That left me with a bare section of wire in front. You could use more nosegays and puffs to cover it or add a small "bird" there. I HAD planned to use a large bow as shown on the instruction sheet, but found my ribbon was too narrow and soft for that use, so I made four smaller bows and attached them in a row up the front wire and teased the tulle forward a bit over the edges of them. Having dark hair, it filled in nicely. If you are fair haired you may find you need more material for adequate cover. This project can easily be made in one afternoon once you assemble your supplies.
|

Original frame from website
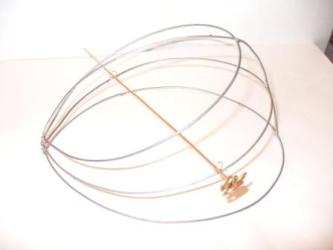
Soldered frame from side with hatpin to show ring placement
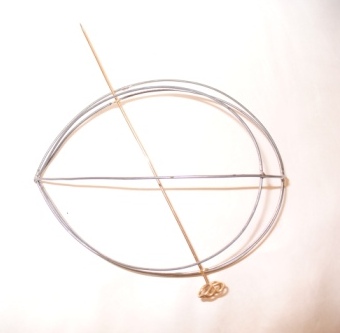
Soldered frame from top with hatpin
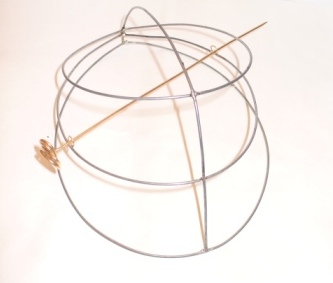
Soldered frame from front with hatpin
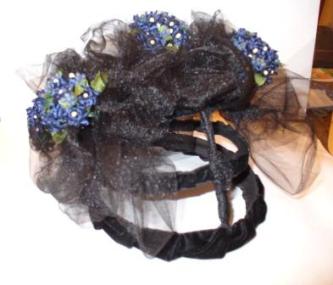
Hat with ribbon covered wires and puffs mostly attached
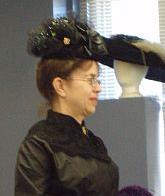
Here I am in my new hat!